Page header image
Module 6: Canvas Accessibility 
Last updated: 5/8/20
Canvas is the Learning Management System (LMS) that has been adopted by DVC, as well as the majority of community colleges in the California Community College system. Both online and face-to-face courses use Canvas as a means to facilitate learning.
Canvas is built on a platform of accessible code. However, like any web-based system, the person who inputs information into it must also follow basic accessibility best practices. In other words, the "shell" is already accessible, and it is up to us to ensure that what we put in that shell is also accessible. The following strategies will teach you best practices for content created within Canvas (i.e. not uploaded from Word or PowerPoint). For accessibility tips for Word and PowerPoint content, see Module 2 and Module 3.
This tutorial focuses on five accessibility best practices. Click the links below to skip to your desired content.
Add alternative text to images
Run the Canvas Accessibility Checker
Add alternative text to images
Alternative text, or alt text, is text embedded within the code of your Canvas page that describes an image. Screen-reading software can detect the alternate text and voice it for students with visual impairments.
- Within your Canvas course, navigate to the page which contains the image.
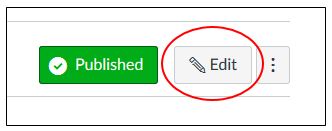
- Click the Edit button, which will open the Rich Content Editor (RCE).
- For the purposes of this tutorial, we are going to assume that an image is already
inserted into your page. Click on the image to select it, then click the "Embed Image"
button.

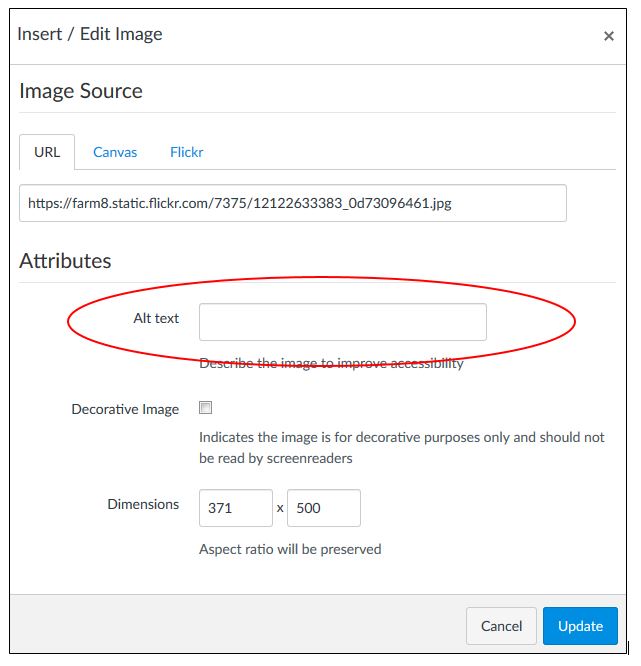
- The "Insert/Edit Image" box will appear. Locate the "Attributes" area and the box
next to "Alt text". Type in a description for your image (e.g. Student sitting at
computer). For a purely decorative image, you can check the box beneath the Alt text
box. This will hide the decorative image from screen-reading software and will not
be voiced.
- Click Update, and your alternate text will be saved. You won't be able to see it, but it's there!
Add styles to text
Using styles is a way to "tag" elements in your page in order to define whether the text is a Header 2, Header 3, Header 4, or a paragraph. We use these tags in the same way we think of an outline; the title of the page is typically Header 1, while main headings are Header 2, subtitles are Header 3, and so on. All text that is not a heading can be considered "paragraph" text.
For the purposes of this tutorial, we will add styles to text that already exists on the page.
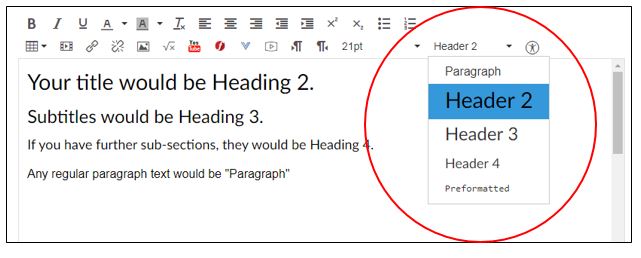
- Select the text with your mouse, and then select the proper header from the drop-down
menu. Use the following style guide when determining which style to use:
- Main heading would be Header 2
- Subtitles would be Header 3
- Sub-subtitles would be Header 4
- Any regular text would be "Paragraph"
Caption videos
Canvas recently released its own video creation tool called Canvas Studio which can auto-caption on demand. Crystala Button, Technology Training & Development Coordinator, has put together this wonderful guide for getting started with Canvas Studio, including information on how to edit auto-captions for accuracy.
Identify headers in tables
For the purposes of this tutorial, we will assume there is already a table on your page.
- To identify column headers, select the relevant cells in the table. In the Table menu, select "Cell
properties".

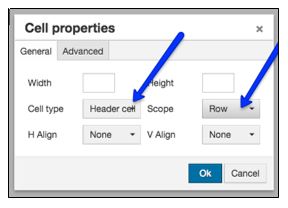
- In "Cell properties", set the Cell type to "Header cell", and in the Scope menu, select
the "Column" option.
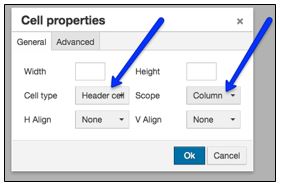
- To identify row headers, repeat steps 1 and 2 but in the Scope menu, select the "Row" option.
Run the Accessibility Checker
Canvas has an Accessibility Checker button that will scan your page for some access errors. It will check for alternate text and table captions, but it does not check for styles or table headers. Make sure to check those two elements yourself.
- On your page, click "Edit", then click the "Check Accessibility" button on the far
right corner.
- On the right side of your screen, a window will appear which addresses each accessibility issue the checker found. It will allow you fix the problem within the window and then click "Apply" and "Next" to move through each issue.
Additional resources
The following is a compendium of external resources related to making your Canvas content accessible for students with disabilities.
- Canvas has published accessibility tutorials for specific Canvas features:
- When you create a page within your Canvas course, the Rich Content Editor (RCE) opens. The RCE supports multiple accessibility features for easy content creation:
- Some students have an accommodation for extra time for tests and quizzes. View this tutorial to learn how to grant extra time for a quiz within Canvas. (Source: https://community.canvaslms.com/docs/DOC-2061)
- Many vendors publish a Voluntary Product Accessibility Template (VPAT), a standardized document which evaluates a product's accessibility in accordance
with Section 508 standards. Vendors note how aspects of their product support each
criterion under 508. Because it is a self-disclosing document, it often behooves the
purchasing entity to test the product themselves to ensure the VPAT is accurate. View the Canvas VPAT
- Northwestern University published an article titled "Five ways to make your Canvas course more accessible". It includes links to other external sites for reference and has helpful videos for
adding headers and alternate text to images within the Rich Content Editor.
- The University of Minnesota's Accessible U includes "Canvas Accessibility Considerations". This site focuses largely on design, offering valuable tips for making your Canvas course inviting and accessible for
all types of students from the landing page to the individual course materials.
- Penn State's ACCESSibility project includes Canvas tutorials for many of the same topics covered by the other sites, but also has information on writing accessible math equations in the Rich Content Editor.